Scrapbooking can renew your soul, refresh your mind as well as preserve your treasured memories. This is a great opportunity for you to get more than your monies worth and get your scrapbooking layouts completed. Our club starting in Feb will meet once each month for a full year. If you decide to take part now you'll receive the following benefits for YOU.
(Below is our first project for 2010)
 Here are the exciting PERKS:
You will receive over $60 in
FREE products just for being a club member!
~You will get the stamp of the Month
FREE during your month! It's a $26.13 value!
~You will get Connection Club gift located on the back of the Idea Book, FREE with each new book.
~You will get the Idea Book ($3.95 value)
FREE of charge each term (four per year for a total of $15.80)
~You might also like to know that for the members who participated in all 12 months will also
receive a 12x12 Close to My Heart linen album free. That's nearly a $35 value.
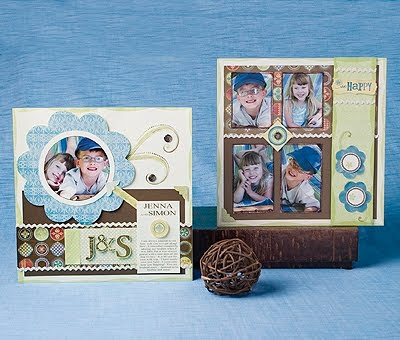
(Below is the 2 page layout completed Nov's club meeting.)
 Here are the details of the Scrapbook Hostess Club Commitment:
· Each month you will purchase the supplies to make the month's project. (The project will be chosen by a vote of attending club members at the previous month's meeting)
· The club meets for a year. (once a month on a date selected by all attending members at the previous month's meeting.)
· Your minimum purchase will consist of the paper and accessories you will need to create the month's projects and so much more.
· The cost of the kit is $25.00. You will get a minimum of $25.00 in supplies. Most months you will have enough left over supplies for several other projects. You can select to purchase the Better ($35 kit) or the Best kit (price varies). The better & best kit contains an exclusive stamp set that can only be purchased during the workshop, the best kit contains other coordinating accessories.
First 2009 Club project used Emporium
A sample of your kit may be: Our beautiful coordinating Background and Texture Paper and cardstock from a themed Level 2 Paper Pack, and Items such as coordinating My Stickease, My Acrylix Stamps, or coordinating accessories such as Ribbons, My Accents, Bigger Brads, Chipboard, etc.· Your cost provides you with 100% products and no class fees. (You pay for materials but not a class fee.) 1. These pages are created with tools and techniques so you learn as you go/grow. 2. Many of these designs come from our unique Scrapbook Programs, such as Cherish and Imagine.
· You are required to BYOBasics: paper trimmer, adhesive, scissors, glue dots, etc.
· If you can not attend class, then I will have a class kit with directions ready for you and you can pick it up at your convenience.
· When joining, you will be able to choose an open month to bring drinks and refreshments for your class. That is the month that you will receive the Stamp of the Month for
FREE!
Another benefit to belonging to this exclusive scrapbook club is you will receive a
FREE monthly scrapbook class from me! I will teach you new techniques, we'll use new products, and I'll guide you as you create 2 or more incredible layouts each month! I'm so excited to teach you the many wonderful things you can do with the products you purchase. They won't sit on the shelf and stay packaged up in the bag! We all know how often this becomes a problem, but I guarantee you won't be dealing with this issue by being in this club!
I want to go one step further and offer you an extra incentive to get even more products FREE:· If you recruit a friend that I haven't invited to join the club with you then you will receive any "A" size stamp set ($10.95 value) or Level 1 kit ($9.95 value) in the current catalog FREE! · If you recruit 2 friends to join you will receive any "B" size stamp set ($13.95 value) or a Level 2 paper pack ($12.95 value) in the current catalog FREE! I am very excited about this Scrapbook Hostess Club and would love for you to be a part of it!
Feel free to contact me via email or phone if you have any questions or if you would like to sign up. Please let me know if you have any questions.

 The top two cards are from the ever tasty Felicity Paper Kit from Close To My Heart. It's a special kit that you can earn free or purchase out right. But the time is limited, it ends Sunday. The card pattern from the round card can be found in the ever helpful "Wishes" book from Jeanette Lynton. It's called Merry Go Round. The second card uses a Cricut Cartridge for the tree and scallops. The colors are bamboo, twilight, cocoa, and sorbet. The branch and heart leaves came from the exclusive stamp set included in the CTMH Twitterpatted Workshop on the Go.
  I made these cards for each of my current club members as thank you for being such fun and faithful members. I left them blank so they could use them & pass on the joy. The paper is from Notebook, the colors are black, crystal blue, bamboo, and hollyhock. Everything on all cards is CTMH. The Flower stamp set is the exclusive set that came with the Sweet Home Work Shop on the Go. The T is a Circut cut letter, and the Thanks came from Thoughtful Seasons.


 Now that the paper is attached and dried, use the spray acrylic sealer to seal the paper and prep it for mod podge. I gave mine a couple of light coats before using the mod podge. After drying I added several light coats of mod podge with a paint brush. Make sure to cover any overlapping paper edges really well (that means several coats). I found that mod podging worked best when the items seams are guled down well.
  If it's not you can use the mod podge as a glue and keep going over it until it's sealed. When you are satisfied with your mod podge and it's dry spray a couple of more coats of the acrylic sealer. The sealer kept the item from bubbling and feeling sticky or tacky.